


FireFly - Sil-Poly fabric
Regular price$315.00
/
2 reviews
- In stock, ready to ship
- Backordered, shipping soon
Made in the USA.
US Patent No. 8555908
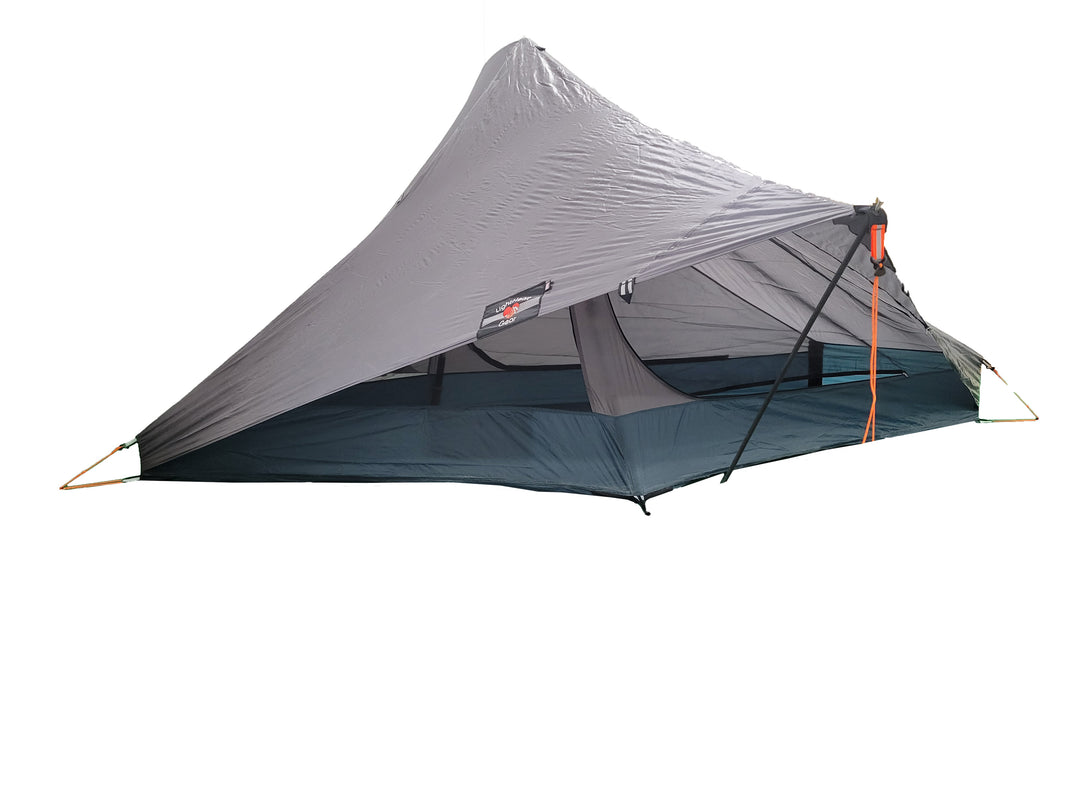
- 3-Season, fully enclosed, roomy 1 person tent.
- Weight;
- Before Seam sealing: SilPoly -29 oz includes stuff sack, ridge pole and awning pole.
- After Seam Sealing: SilPoly - 30 oz. Includes stuff sack, ridge pole and awning pole.
- Floor area – 26.8 Sq. Ft.
- 45 inches headroom.
- 105 inches long, 55 inches at widest, 30 inches at foot.
- Imported fabric - 20D micro-ripstop polyester, silicone coated both sides, > 3000mm HH.
- Colors - Camouflage/Coyote, Steel blue/Silver, Silver/Steel blue.
- Hybrid, double/single wall tent.
- 2 large side entry doors with 2 way zippers.
- One pocket.
- Rain fly on back comes to about 8 inches from ground.
- Awning fly on front extends out 30 inches
- 10 inch carbon fiber stays in the back corners.
- 5 inch carbon fiber stay in the front tip.
- Line lock adjustments on all tie outs.
-
- 8 inch bathtub floors.
- Includes ridge pole, matching stuff sack and reflective tie out cord.
- Internal pole sleeve for ridge pole.
- Utilizes a pair of trekking poles for set up (not included).
- Requires 7 stakes (not included).
- Requires seam sealing prior to use.
- Camouflage version only has no reflective webbings or tie out cord.
- Stakes sold separately.
- Optional tent poles sold separately.
- Optional orange zipper pulls sold separately.
Instructions:
- Stake out the front tip and back 2 corners of the tent keeping the floor slightly taut. Make sure the sides are squared off and parallel.
- Unzip the mesh door and sit inside on the floor of the tent with the ‘ceiling’ of the tent on top of your head.
- Extend both trekking poles to 125 cm and slide the handles inside the tent next of you.
- Insert the carbide tip of one trekking pole into the opening of the ridge pole. (Handle end will be towards the floor)
- Tuck the handle of the trekking pole into the side of the tent wall, on the floor. Then raise the ridge pole to the ceiling, raising the tent as it goes.
- Slip the carbide tip of the second trekking pole into the other end of the ridge pole, and slide the handle into its spot on the side wall, along the floor. At this point, the tent should be loosely erected. Take care that the trekking poles do not slip out of the ridge pole as they can cause damage to the tent.
- If you cannot extend the trekking poles enough to remove the slack in the side walls, step outside the tent, loosen the tension on the 3 Line Locks, then try to raise the trekking poles a little higher and get a tighter pitch to the tent.
- After the trekking poles and ridge pole are secured in place, step out the tent and adjust the Line Locks at the 3 corners so that the corners are standing upright and there is no slack in the walls of the tent. Stake out the mid point tie outs along the head and foot ends of the tent.
- Now stake out the fly using the tie out cords provided. The fly will not come all the way down to the ground. It should be a few inches off the ground to allow airflow under the fly.
- For the AWNING, place the tip of the awning pole in the grommet at the tip of the awning, and adjust the placement/angle of the pole so the awning is taut. Stake out the awning with the tie out cord located at the tip bringing the cord nearly straight down to the ground.
- The ridge vent have a short plastic ‘stick’ attached to the tent wall underneath the vent. Velcro this to the vent cover to open ridge vent. Vent can be closed by lowering the stick.
- Temperatures and humidity changes may cause the fabric to sag slightly. This is normal, you can extend the hiking poles a little to tighten the tent and/or re-stake the tent.
- To lower the awning for ‘Storm Mode’ loosen the tie out cord and remove the awning pole (do not remove the stake to the tie out cord for the awning). Attach a small carabineer to the loop of the orange loop at the tip of the awning and the 2 loops that are about 18 inches away on both sides of the tip of the awning. Now, tighten the tie out cord so that the fly is now folded and the awning looks the same as the regular fly side.
- There is a small elastic loop near the top of the awning, and an elastic cord with a toggle on the underside of the awning, you can roll the awning up for full views and ventilation by securing the toggle to the loop on the outside of the tent.
Specs:
- Use: 3 Season
- Style: Hybrid -Double/ Single Wall
- Sleeps: 1+
- Weight: 29 oz before seam sealing. (27.5 oz - Camouflage)
- Head Room: 45 in.
- Pockets: 1
- Doors: 2
- Floor Area: 26.8 Sq. Ft.
- Vestibule: 3.75 Sq. Ft.
- Floor Dimensions: L - 105n. W - 55 in., foot-30 in.
- Material: 30D Ripstop nylon 66, Camouflage -20D micro ripstop polyester
- Pole Length: ~ 130 cm.
Seam Sealing
It is easier to seam seal the tent when it is set up. You must use a silicone based seam sealer such as McNett SilNet seam sealer.
1. Seam seal the fly from the OUTSIDE. Seal the entire ridge line from tip to tip
2. Seam seal the floor patches from the INSIDE of the tent as well as the seam in the floor.
3. Seam seal the edges of the bathtub floor for at least one foot from each end of the tent.
4. It helps to place a few rows of seam sealer along the floor to provide traction.
You can make your own seam sealer as follows
• Clear silicone caulk (Purchased at any hardware store.)
• Mineral Spirits - Commonly used for cleaning paint brushes.
• Small brush to apply the sealer - a small foam brush works well.
